October 7, 2024
A Christmas Layout That Sleighs
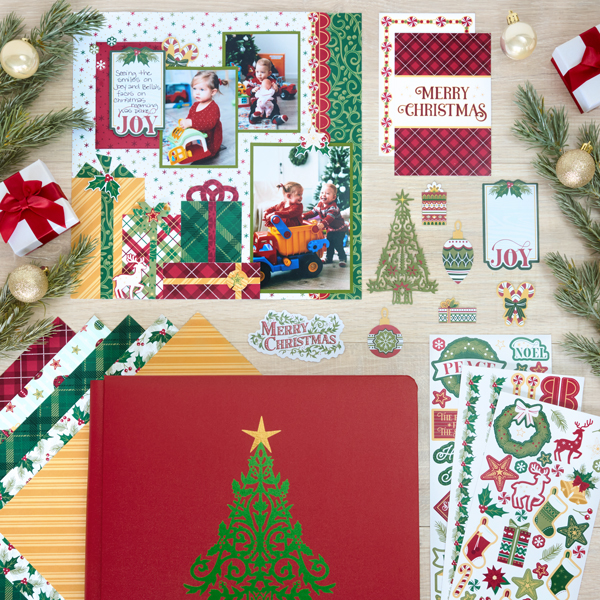
It’s never too early to start the countdown to Christmas! Get in the holiday spirit with layouts created with the Christmas Charm collection, like the one below! You can use designer papers to make presents and complementing ribbons. We’re sure yule love recreating this layout!

To create this layout you will need:
- Christmas Charm Paper Pack or (Shop Canada | Shop Australia)
- Christmas Charm Stickers or (Shop Canada | Shop Australia)
- Christmas Charm Embellishments or (Shop Canada | Shop Australia)
- Christmas Charm Variety Mat Pack or (Shop Canada | Shop Australia)
- Custom Cutting System with Oval Patterns or (Shop Canada | Shop Australia)
- 12-inch Trimmer or (Shop Canada | Shop Australia)
- All-Purpose Scissors or (Shop Canada | Shop Australia)
- Tape Runner or (Shop Canada | Shop Australia)
- Repositionable Tape Runner or (Shop Canada | Shop Australia)
- Precision Point Adhesive Pen or (Shop Canada | Shop Australia)
- Foam Squares Variety Pack or (Shop Canada | Shop Australia)
- Black Dual-Tip Pen or (Shop Canada | Shop Australia)

To create the base:
Step 1: Use a piece of sparkles paper for the base of the layout.
Step 2: Cut a piece of floral filigree to measure 2” x 12”. Adhere along the right side of the layout.
Step 3: Adhere the border stickers along the seam of the floral filigree paper strips.
To create the gifts:
Yellow Gift
Step 1: Cut a piece from the yellow stripes paper to measure 3” x 5”.
Step 2: Cut a piece from floral filigree to measure ½” x 5”. Adhere to the center of the previous piece as the ribbon.
Step 3: Use scissors to cut three small triangles from a corner of a piece of paper, then adhere to the top for the bow.
Step 4: Adhere to the lower left corner of the layout.
Red/Green Plaid Gift
Step 1: Cut a piece from multi-plaid paper to measure 2-1/2” x 3-1/2”. Adhere overlapping the previous gift.
Step 2: Cut a piece from the trees paper to measure ¼” x 3-1/2”. Adhere vertically in the center of the gift for the ribbon.
Step 3: Cut a piece from the trees paper to measure ¼” x 5”. Loop the ends around to create a bow, adhering with Precision Point Adhesive. Cut the ends to desired length with scissors. Adhere to the top of the gift with a foam square.
Red Gift
Step 1: Cut a piece of paper to measure red plaid paper to measure 4” x 1-1/2”. Adhere along the bottom edge of the layout, overlapping the previous gift slightly.
Step 2: Cut a strip from the yellow stripes paper to measure 4” x ¼”. Adhere to the center of the gift for the ribbon. Cut another piece from this paper to measure ¼” x 1-1/2”. Adhere to the gift vertically across the previous strip.
Step 3: Using the small-CCS circle pattern on the inside with the blue blade, cut a circle from the yellow strips paper. Use scissors to cut strips into the circle. Adhere to the center of the “ribbon” piece using a small foam square.
Green Gift
Step 1: Cut a piece from the green plaid paper to measure 2-1/2” x 2-1/2”. Adhere above the red plaid gift.
Step 2: Cut a piece of red tonal stars paper to measure ¼” x 2-1/2”. Adhere vertically to the gift for the ribbon.
Step 3: Using the smallest oval CCS pattern on the inside with the blue blade, cut a circle. Without moving the oval, cut with the red blade to create the oval rings. Adhere/tuck the rings behind the top of the green plaid paper for the bow.
To create the photo mats:
Step 1: Cut photo mats from avocado cardstock to measure: (1) 4-1/4” x 6-1/4” and (2) 3-1/4” x 4-1/4”.
Step 2: Cut photos to measure: (1) 4” x 6” and (2) 3” x 4”. Adhere to the mats.
Step 3: Cut a large variety mat in half to measure 3-1/4” x 4-1/2”. Adhere under the left photo on the layout.
Step 4: Adhere stickers and embellishments as desired, using foam squares on some for dimension.
Step 5: Journal as desired.
How cute are those presents?! How excited would you be if you found those under the tree?
P.S. Are YOU a member of the Virtual Crop Facebook Group? It’s your go-to place for MONTHLY Virtual Crops, MONTHLY Completed Album Challenges, QUARTERLY Secret Box Openings with project tutorials and so much more! We hope you’ll join our community of more than 40,000 fellow memory-keeping enthusiasts — you’ll feel right at home!

Creative use of those ovals! Great layout!
I’ve just been a member of your Virtual Crop Facebook group with my profile. I own a company who creates pictures with words, maybe can be an interesting idea for CHristmas too.