March 25, 2024
March Completed Album Challenge PLUS A Calendar Layout

Left, left, left, right, left. With the end of the month around the corner, we’re marching right into the March Completed Album Challenge! And if you’re in need of an idea for documenting your days and getting an album on the shelf, then this scrapbook calendar layout is here to help you cross the project finish line!
If you completed an album this month (does not need to be from start to finish in March, just completed in March), make a short video flipping through each of the pages in your newly completed album. Then, post your video in the Virtual Crop Facebook Group with the hashtag #CompletedMarch2024 for the chance to win!
Here’s an example of what your Completed Album Challenge video could look like!
For ALL the details on the Completed Album Challenge, check out this blog post.
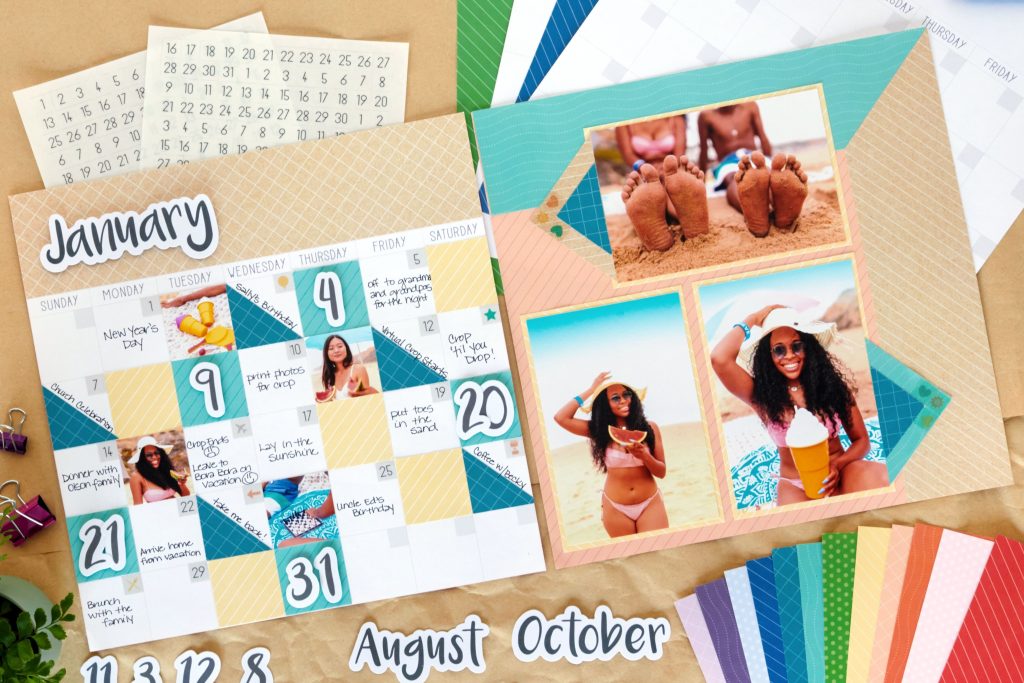
To create this spread you will need:
- This Life Calendar Kit Bundle or (Shop Canada | Shop Australia)
- This Life Calendar Kit
- Monthly Numbers Embellishments (40/pk)
- Monthly Titles Embellishments (12/pk)
- 12-inch Trimmer or (Shop Canada | Shop Australia)
- Square Punch or (Shop Canada | Shop Australia)
- Tape Runner or (Shop Canada | Shop Australia)
- Repositionable Tape Runner or (Shop Canada | Shop Australia)
- Foam Squares Variety Pack or (Shop Canada | Shop Australia)
- Black Dual-Tip Pen or (Shop Canada | Shop Australia)

Step 1: Use calendar paper for the base of the left side and tangerine paper for the base of the right side of the spread.
Step 2: Use a kraft diagonal strip and an island waters strip from the kit and place along the 45-degree angle on the 12-inch Trimmer with the top corners on the cutting line. Cut and set the triangle pieces aside.
Step 3: Adhere the two strips along the top and right edges of the right side of the layout, mitering the corners.
Step 4: Using canary paper, cut two 4-1/4? x 6-1/4? photo mats and one 6-1/4? x 4-1/4? photo mat. Adhere mats to the layout.
Step 5: Using the triangle pieces cut from the strips in step 2, adhere them along the edges of the photos as shown.
Step 6: Adhere a kraft grid strip on the top of the left side of the spread.
Step 7: Using the Square Punch, punch several photos. Adhere to the calendar randomly.
Step 8: Using the Square Punch, punch several square pieces from a variety of papers, adhering on the calendar randomly.
Step 9: Punch several squares using the Square Punch. Cut from corner to corner creating triangle pieces. Adhere triangles to the calendar.
Step 10: Adhere a Monthly Titles Embellishment and Monthly Numbers Embellishments using Foam Squares.
Step 11: Adhere small number stickers to the calendar for daily dates.
Step 12: Journal as desired.
Are you close to completing an album this month? (Perhaps this scrapbook calendar kit layout could be the number one way to complete your album!) Remember to share a short video of you flipping through your completed album in the Virtual Crop Facebook Group (with the hashtag #CompletedMarch2024) for a chance to win — good luck!
Learn about the Sticker Buffet by watching the video below!
For a limited time during the Sticker Buffet, when you purchase ANY combination of 8+ ABC/123 Letter Sticker packs, you’ll earn the exclusive Sticker File Mate FREE! (Limit 3 free gifts per order.) AND there are NEW Classy Mini ABC/123 Stickers you can purchase — learn more about the mini stickers and the Sticker File Mate in the video above!
For more info, click: US | CA | AU
P.S. Are YOU a member of the Virtual Crop Facebook Group? It’s your go-to place for MONTHLY Virtual Crops, MONTHLY Completed Album Challenges, WEEKLY LIVE STREAMING of Fast & Fun Projects with Noreen, LIVE QUARTERLY Secret Box Openings with project tutorials and so much more! We hope you’ll join our community of more than 38,000 fellow memory-keeping enthusiasts — you’ll feel right at home!