June 16, 2025
Explore All Six Scenes Collection Borders — From the Prairie to the Pacific Coast!
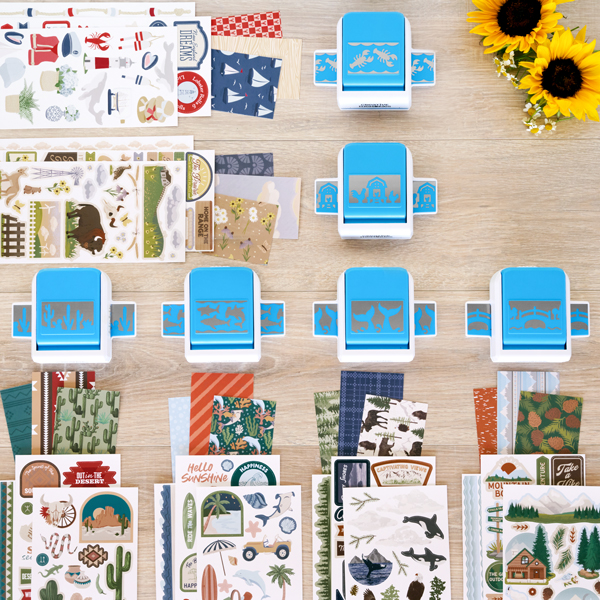
Whether your heart belongs to the wide-open prairie, rugged mountain trails, or sandy beach shores, the Scenes collections from Creative Memories capture the spirit of your favorite places — one border at a time. Each of these six coordinating borders features custom papers, punches, and stickers designed to bring your layouts to life. From charming farm silhouettes to cactus-lined desert views and wave-chasing coastlines, these borders are perfect for setting the scene on your scrapbook pages.
To create these borders, you will need these general products:
- Micro-Tip Scissors or (Shop Canada | Shop Australia)
- 12-inch Trimmer or (Shop Canada | Shop Australia)
- Photo Trimmer or (Shop Canada | Shop Australia)
- Tape Runner or (Shop Canada | Shop Australia)
- Repositionable Tape Runner or (Shop Canada | Shop Australia)
- Foam Squares Variety Pack or (Shop Canada | Shop Australia)
- Black Dual-Tip Pen or (Shop Canada | Shop Australia)
Jump to:

Prairie Scenes Border
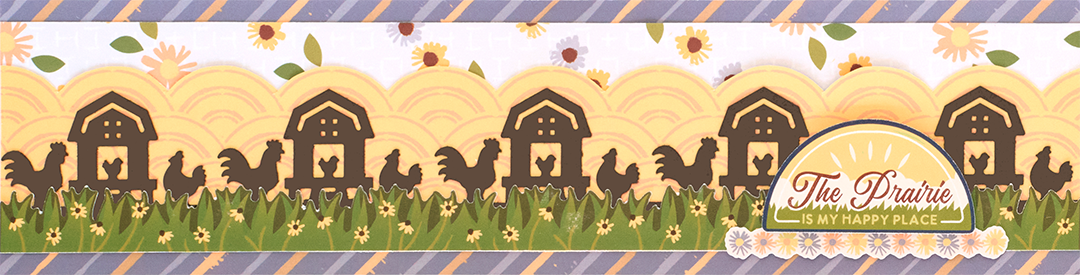
Ingredients:
- Prairie Scenes Designer Paper and Stickers or (Shop Canada | Shop Australia)
- Hot Fudge Solid Cardstock or (Shop Canada | Shop Australia)
- Chicken Coop Border Punch or (Shop Canada | Shop Australia)
Step 1: Cut a 12” x 3” strip with stripes paper for the base. Cut a 12” x 1” strip with little flowers paper and adhere 1/4″ from the top of the base.
Step 2: Using Micro-Tip Scissors, cut around the scallops on a piece of sunrise paper. Trim to 2” and adhere on the border, 1/4″ from the bottom.
Step 3: Using the Chicken Coop Border Punch, punch a border with hot fudge cardstock. Trim to 12” x 1-3/4” and adhere on the border.
Step 4: Adhere a grassy border sticker on top of the hot fudge strip. Adhere stickers, popping the title up with foam squares.
Mountain Scenes Border:
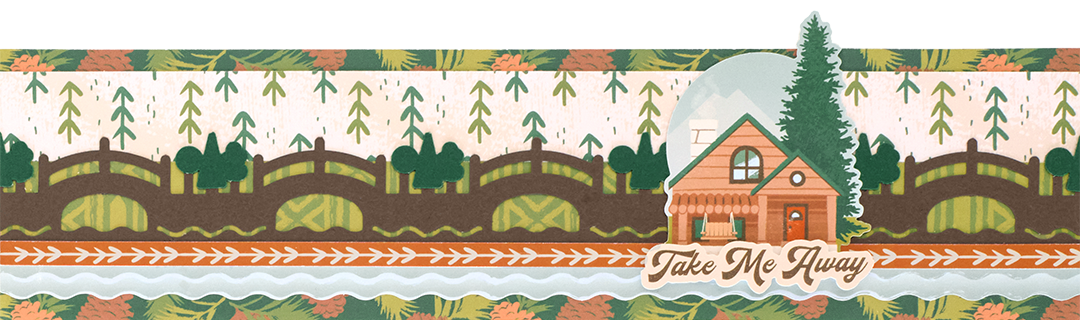
Ingredients:
- Mountain Scenes Designer Paper and Stickers or (Shop Canada | Shop Australia)
- Hot Fudge Solid Cardstock or (Shop Canada | Shop Australia)
- Dark Green Solid Cardstock or (Shop Canada | Shop Australia)
- Bridge & Trees Border Punch or (Shop Canada | Shop Australia)
Step 1: Cut a 12” x 3” strip with pinecones paper for the base. Cut a 12” x 1” strip with little pines paper and adhere 1/4″ from the top of the base. Cut a 12” x 1” strip with green geo paper and adhere just below the little pines strip.
Step 2: Using the Bridge & Trees Border Punch, punch a border with hot fudge cardstock. Punch another with dark green cardstock. Trim each to 12” x 1-1/4”. Using Micro-Tip Scissors trim out the tree sections of the dark green border and adhere the on top of the brown border’s trees. Adhere the brown border on the green strip.
Step 3: Adhere a river border sticker just below the Bridge & Trees border, 1/4″ from the bottom of the base. Adhere a vine border sticker on the seam.
Step 4: Adhere stickers, popping the title up with foam squares for dimension.
Desert Scenes Border:
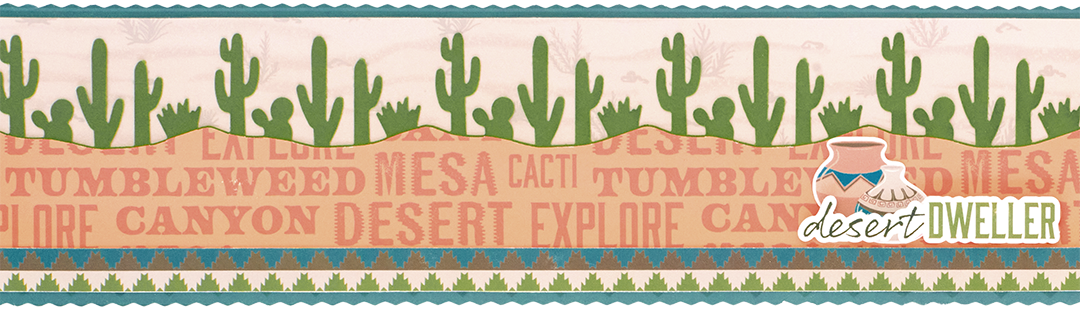
Ingredients:
- Desert Scenes Designer Paper and Stickers or (Shop Canada | Shop Australia)
- Avocado Solid Cardstock or (Shop Canada | Shop Australia)
- Cacti Border Punch or (Shop Canada | Shop Australia)
- 12-inch Trimmer Straight Blade or (Shop Canada | Shop Australia)
- 12-inch Trimmer Pinking Blade or (Shop Canada | Shop Australia)
Step 1: Using the Pinking Blade, cut a 12” x 3-1/4” strip with teal stripes paper for the base. With the straight blade, cut a 12” x 1-1/2” strip with sand paper and adhere on the base, 1/8” from the top.
Step 2: Using the Cacti Border Punch, punch a border with avocado cardstock. Trim to 12” x 2-7/8” and adhere on the border, 1/8” from the bottom. Punch another cacti border with words paper. Trim to 12” x 2-7/8”.
Step 3: Using Micro-Tip Scissors, trim off the cacti, leaving just the “sand”. Adhere on the border as shown.
Step 4: Adhere a geo design border sticker along the bottom edge of the words strip. Adhere stickers, popping the title up with foam squares.
Beach Scenes Border:
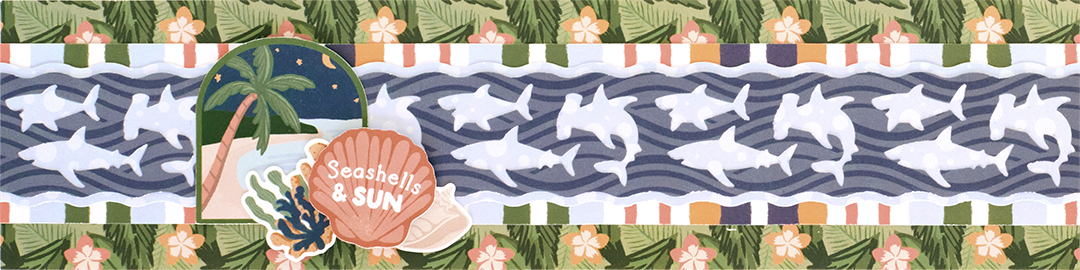
Ingredients:
- Beach Scenes Designer Paper and Stickers or (Shop Canada | Shop Australia)
- Shark Border Punch or (Shop Canada | Shop Australia)
Step 1: Cut a 12” x 3” strip with flowers & leaves paper for the base. Cut a 12” x 2” strip with multicolor stripes paper and adhere on the base.
Step 2: Using the Shark Border Punch, punch a border with beach waves (navy) and bubbles (light blue) papers. Cut the light blue border in half lengthwise.
Step 3: Cut a 12” x 1-3/16” strip with light blue paper. Adhere behind the navy border, then adhere the halves of the light blue borders so that just the scallops show behind the navy piece. Adhere on the border.
Step 4: Adhere stickers using foam square for dimension.
Pacific Scenes Border:
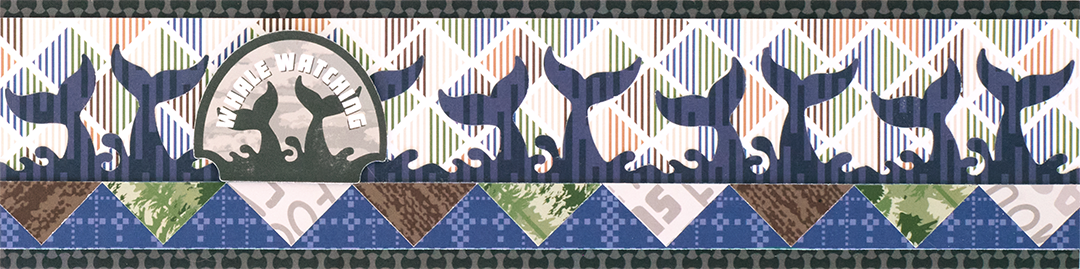
Ingredients:
- Pacific Scenes Designer Paper and Stickers or (Shop Canada | Shop Australia)
- Whale Tail Border Punch or (Shop Canada | Shop Australia)
Step 1: Cut a 12” x 3” strip with geometric gray paper for the base. Cut a 12” x 2-1/2” strip with Pendleton blanket paper and adhere on the base.
Step 2: Using the Whale Tail Border Punch, punch a border with navy chevron paper. Trim to 12” x 2-1/4” and adhere on the border.
Step 3: Cut a 12” x 3/4” strip with blue tonal plaid paper. Adhere on the border. Cut two 1” squares with each brown canvas, words and forest papers. Cut each in half diagonally. Adhere the triangles side by side on the blue tonal plaid strip, alternating colors as shown.
Step 4: Adhere the “Whale Watching” sticker using foam squares.
Coastal Scenes Border:
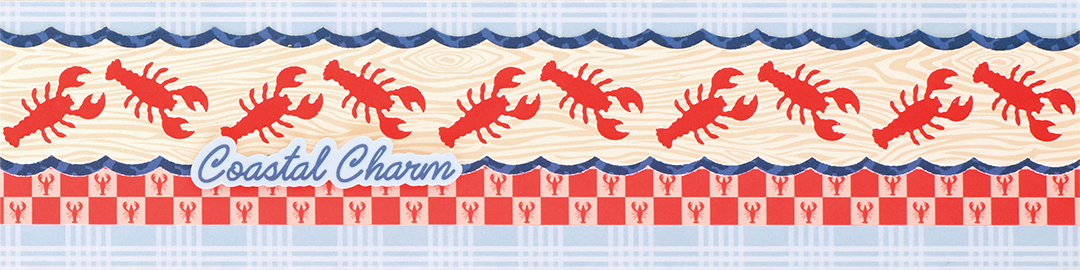
Ingredients:
- Coastal Scenes Designer Paper and Stickers or (Shop Canada | Shop Australia)
- Red Solid Cardstock or (Shop Canada | Shop Australia)
- Lobster Border Punch or (Shop Canada | Shop Australia)
Step 1: Cut a 12” x 3” strip with light blue plaid paper for the base. Cut a 12” x 3/4″ strip with seafood checked paper. Adhere 1/2″ from the bottom of the base.
Step 2: Using the Lobster Border Punch, punch a border with woodgrain paper. Cut a 12” x 1-1/8” strip with red cardstock and adhere behind the border.
Step 3: Punch another border with navy chevron paper. Cut the border in half lengthwise. Adhere the halves behind the woodgrain border so just the scallops show. Adhere on the border as shown.
Step 4: Adhere the “Coastal Charm” sticker using foam squares.
Ready to bring your favorite destinations to your scrapbook? Whether you’re crafting a rustic getaway, desert escape, or beach day story, these Scenes borders make it easy to highlight every memory. Try pairing them with the coordinating layout designs or mix and match elements for a look that’s all your own. With so many ways to customize each scene, the only limit is your imagination — and your next destination.
P.S. Are YOU a member of the Virtual Crop Group? It’s your go-to place for MONTHLY Virtual Crops, MONTHLY Completed Album Challenges, QUARTERLY Secret Box Openings with project tutorials and so much more! We hope you’ll join our community of more than 46,000 fellow memory-keeping enthusiasts — you’ll feel right at home!